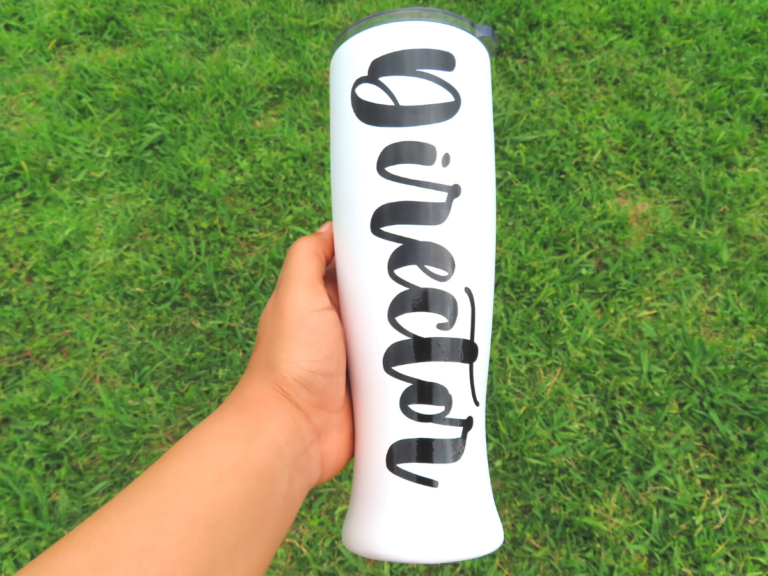
If you’re a fan of creative DIY projects, then you’re going to love the latest craft craze I’ve been diving into – creating personalized tumblers using a Cricut machine! These stylish and unique tumblers are perfect for gifting and are surprisingly easy to make. Imagine the delight on someone’s face when they unwrap a tumbler customized just for them. Whether you’re crafting for friends, family, teachers, or even cheer squads, these personalized tumblers are ideal for birthdays, holidays, or just because. Plus, this fun hobby can easily turn into a profitable side hustle, allowing you to make a little extra cash while doing something you enjoy.
In this guide, I’ll walk you through the step-by-step process of making a personalized tumbler using your Cricut machine. Whether you’re looking to create a sleek design or something more quirky, you’ll be able to customize it to match the recipient’s personality. Let’s get started!
Materials Needed for Your DIY Tumbler
To begin, here’s a list of materials you’ll need to create your custom tumbler:
- A tumbler (any size or style you like)
- Cricut machine
- Cricut Design Space software
- Premium Cricut vinyl (color of your choice)
- Cricut Transfer Tape
- Weeding tool
- Scraper or Brayer tool
- Rubbing alcohol and cotton pads
- Cutting mat
Step-by-Step Guide to Crafting Your Personalized Tumbler
1. Measure Your Tumbler
Before jumping into the design, you need to measure the height of your tumbler. This will ensure your design fits perfectly on the cup. For example, if your tumbler is 10 inches tall, you’ll want to make sure your text or design fits comfortably within that space.
2. Designing Your Text in Cricut Design Space
Now that you have your measurements, open Cricut Design Space on your computer or mobile device and click “New Project.” Here’s how to design the text or name you want to place on the tumbler:
- Click “Text” and type in the name or word you want to use (e.g., «Director»).
- Choose a font that fits your style. I chose the free «Muthiara» font from dafont.com. Remember, if you plan to sell your tumblers, you’ll need to purchase a license for the font.
- Adjust the letter spacing, so the letters are close but not overlapping.
- Click “Ungroup” to move each letter individually, making sure they are aligned and look connected.
- After adjusting the letters, select the entire word and click “Weld.” This ensures that the Cricut machine cuts the design as one solid piece, rather than individual letters.
3. Cutting Your Design
Once your design is ready, it’s time to cut it out:
- Set your design to fit within the tumbler measurements you took earlier. For instance, if your tumbler is 10 inches tall, you may want your word or name to be around 8 inches wide.
- Click the “Make It” button, and select the appropriate material size (usually 12”x12”).
- Place your black Cricut vinyl on the cutting mat and load it into the machine.
- Set the Cricut machine dial to “Custom” and choose “Premium Vinyl” from the material settings on your computer. Increase the pressure to “More” for a cleaner cut.
- Press “Go” and watch your Cricut machine work its magic!
4. Applying Your Vinyl Design
Once your Cricut has finished cutting the design, carefully remove the vinyl from the mat using the weeding tool to eliminate any excess material.
- Cut a piece of Cricut Transfer Tape slightly larger than your design and press it onto the vinyl.
- Use your scraper tool or Brayer to ensure the tape adheres to the vinyl.
- Clean the surface of the tumbler with rubbing alcohol to remove any dirt or oils that might prevent the vinyl from sticking properly.
- Carefully align your vinyl design onto the tumbler, ensuring it’s straight, and press it down starting from the center and working your way out to avoid air bubbles.
- Peel off the Transfer Tape at a 45-degree angle. If any part of the vinyl lifts, press it back down with the scraper and try again.
5. Caring for Your Custom Tumbler
To keep your personalized tumbler in top shape, always wash it by hand. Avoid using the dishwasher, as it could cause the vinyl to peel or fade over time. If you notice any air bubbles after applying the vinyl, gently use your scraper tool to smooth them out.
Conclusion: Get Crafty and Start Creating!
And that’s it! You now know how to make personalized tumblers using your Cricut machine. This project is not only simple and fun but also a great way to showcase your creativity. Whether you’re making tumblers for gifts or selling them for some extra income, the possibilities are endless.
I’d love to hear about the tumblers you create! Drop a comment below to let me know what words or names you’ll put on your designs, and who you’ll be gifting them to. If you enjoyed this project, be sure to check out my other Cricut tutorials, like how to make custom t-shirts.
Follow me on Pinterest, YouTube, or Twitter for more creative ideas, and don’t forget to subscribe to my email list so you never miss an update! Happy crafting!
3D Fonts for Cutting Machines
Motivational quotes for hard times
Heart monogram for Cricut Machine
Unicorn Monogram SVG Free Download
Watercolor Clipart for Cricut

