
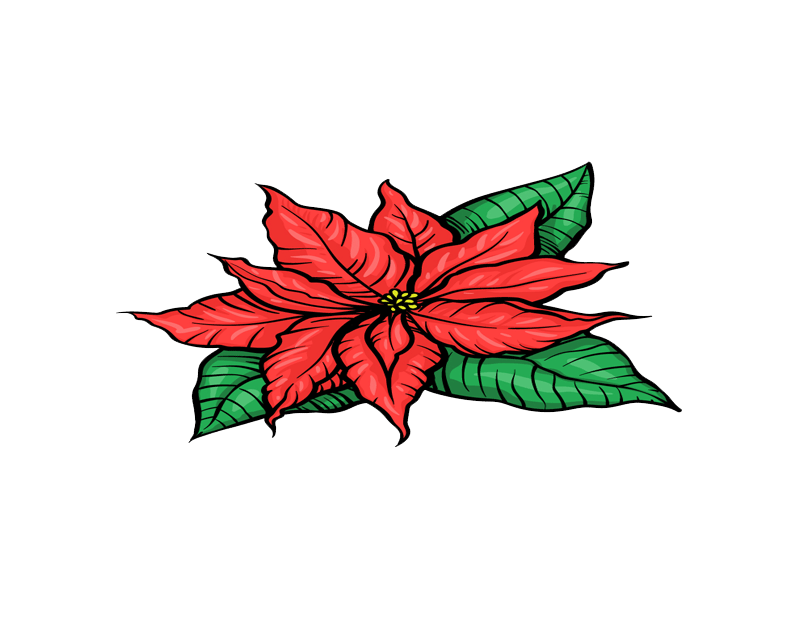
Poinsettia Drawing Easy
With regards to blossoms and plants, there’s something to fit each taste and inclination. The poinsettia is one of these blossoms, and it truly offers a strong expression with its dazzling red petals and green leaves. Beginning in South America and utilized y the Aztecs, it has since turned into a famous bloom around the world. Fanatics of this wonderful bloom frequently prefer to make craftsmanship including it, and figuring out how to draw a poinsettia is an extraordinary method for doing this!
Note: After learning this tutorial visit more Cool Drawing Ideas.
On the off chance that you are one of these individuals, look no further than this instructional exercise, as we will show you the way things are finished. Our bit-by-bit guide on the most proficient method to attract a poinsettia 6 stages will tell you the best way to draw this magnificent plant while having heaps of tomfoolery!
Stage 1 – Poinsettia Drawing
For this aid on the most proficient method to draw a poinsettia, we will be beginning from the middle and moving outwards. You can begin this by drawing a cluster of little round shapes together at the actual focal point of the blossom.
Whenever you have drawn this little cluster, we will then, at that point, define a few somewhat bent boundaries outward from it, as displayed in the reference picture. These lines will later be a piece of the petals for the poinsettia, and we will add more detail to these petals as we travel through the aide.
Stage 2 – Draw a few blueprints for a portion of the petals in this step
We will begin drawing a portion of the petals for your poinsettia attracting this following stage of the aide. For these petals, we will utilize a few marginally rough lines to make the frameworks.
Every petal will circumvent one of the lines that you reached out from the focal point of the bloom prior. These petals will likewise finish in a sharp tip, as they show up in the reference picture. The petal that we will draw at the highest point of the bloom might be half-drawn until further notice, however, we will add the rest alongside certain petals covering it soon. When you’re prepared, we can continue on toward the following part!
Stage 3 – Next, draw the primary leaves for the poinsettia
We will leave the petals until further notice and on second thought center around the main passes on in this aide on the most proficient method to draw a poinsettia. To do this, we will define a few additional bent boundaries that likewise come full circle in sharp focus as the petals did. While comparative in shape, these leaves will be significantly bigger than any of the petals. We will draw two of these leaves until further notice, and the reference picture will show you how they ought to be situated.
Whenever you have drawn the frameworks for these leaves, we will then, at that point, add subtleties to them. To do this, define a bent boundary down the focal point of everyone. Then, at that point, you can broaden a few additional bent lines out from the middle line to the edges of the leaves. Yet again these lines will shape the spine and veins for the leaf, and the reference picture will direct you as you draw these subtleties.
Stage 4 – Presently, draw a few additional petals and leaves
Right now of your poinsettia drawing, you have drawn the two leaves and petals, and in this step we will draw some a greater amount of both. To do this, you can duplicate what you did in the earlier two stages of the aide. That implies that you will draw some petal frames around the lines emerging from the focal point of the bloom.
These petals will have somewhat more line subtleties on their edges than the past ones. There will likewise be a more modest petal over the petal at the base focus of the bloom. When these chimes are drawn, you can then draw one more huge leaf close to the lower part of the blossom. Then, at that point, you will be prepared to continue on toward the following stage where we will polish off the last subtleties.
Stage 5 – Add a last subtleties to your poinsettia drawing
This step of our aide on the most proficient method to draw a poinsettia will see you adding the last subtleties and components before you variety in the picture. You’ll see that after the past step there is an unfilled space close to the upper left of the blossom, and this is where we will add the last petals for the bloom. You can then detail them similarly that you accomplished for the wide range of various petals.
Once these are finished, make certain to add additional subtleties or dashes of your own that you might need! You could draw a foundation highlighting more poinsettias or even a few additional blossoms that you love. How might you polish off this image?
Note: Learn More latest drawing tutorials of Drawing ideas blog.
Stage 6 – Polish off your poinsettia drawing with some tone
In this last piece of your poinsettia drawing, we will polish off with some astounding tone. We referenced how this bloom is notable for its dazzling red and blue variety plot, so that is the thing we went for in this reference picture. Assuming you would like comparably splendid varieties, you could involve some acrylic paints or hued markers for colors that pop. On the other hand, shaded pencils and watercolors would make a decent delicate search for the varieties. Which approach will you take, or will you blend and match your mediums?
Also Read cursos virtuales

